Wednesday, March 28, 2018

Hot Cross Chelsea Buns

Hot Cross Chelsea Buns

I’ve been making different versions of hot cross buns each year – last year it was bagels, the year before that a HCB loaf. I also made Earl Grey & Orange ones for Waitrose a few years ago! This year I went with another English classic to hybridise them with, Chelsea buns, which are my dad’s fave.

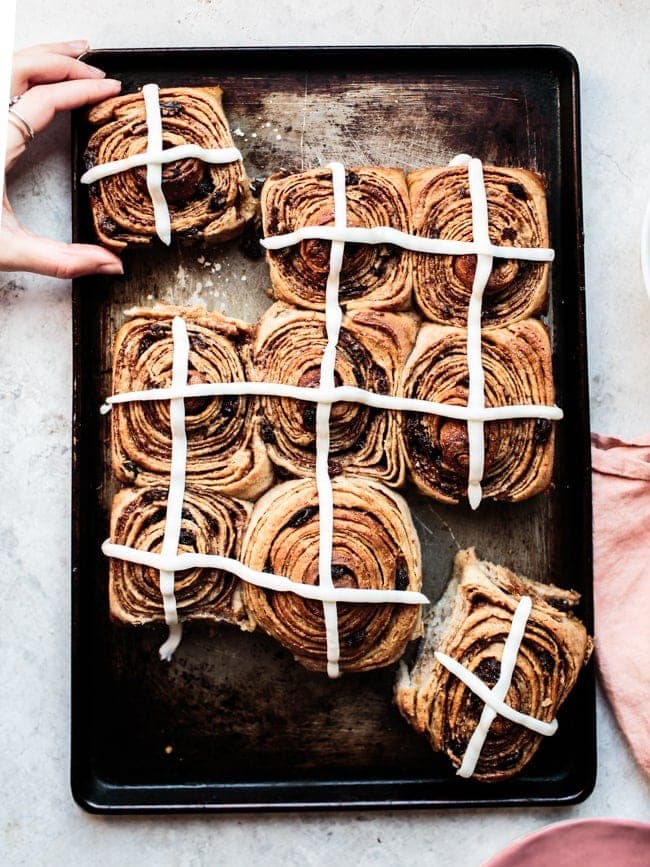
Chelsea buns are pretty much an English version of a cinnamon roll – a yeasted dough rolled very thinly, covered with butter and caster sugar and currants, rolled into tight swirls and baked all nestled together. I’ve had a few buns from bakeries in London before and usually there’s little to no spice involved here! I think the key feature of a good bun though is having thin layers of dough which you can satisfyingly unreel as you eat, like a little ritual. To achieve this effect, I laminated the dough with some filling inside before rolling up, giving me a croissant-like bun.

Hot Cross Chelsea Buns

The ‘hot cross’ aspect here is brought in by using mixed spice in the dough and filling along with cinnamon and mixed dried fruits (which includes currants, candied lemon and orange peel). Usually a hot cross bun has a flour and water paste piped over before baking but I thought that might mess with the layers of dough here. Instead I opted for a simple cream cheese icing piped onto the cooled buns post-bake. The first time I made them, they were demolished by my housemates and me in a few days – just remember that when they’re a few days old and getting a bit dry, zapping one in the microwave for 20-30 seconds helps a lot!

Hot Cross Chelsea Buns

For the paste:

  • 2 tbsp white plain flour or bread flour
  • 90 ml water
  • 200 ml milk (you can use a non-dairy one here)
  • 50 g rapeseed oil (or another neutral oil)

For the dough:

  • 250 g white bread flour
  • 200 g wholemeal bread flour
  • 50 g granulated sugar
  • 1 tsp salt
  • 2 tsp easy-bake ('instant') dried yeast
  • 1 tsp mixed spice
  • zest of 1 orange

For the filling:

  • 2 tsp mixed spice
  • 2 tsp ground cinnamon
  • 150 g light brown sugar
  • 80 g unsalted butter, melted*
  • 150 g mixed dried fruits**

For the frosting:

  • 2 tbsp cream cheese
  • icing sugar (powdered sugar)

Make the paste:

  1. Combine the plain flour and water, then pour into a small saucepan and stir over a medium heat until the mixture thickens into a paste. Take it off the heat then pour in the oil and milk – leave to cool to lukewarm.

Make the dough:

  1. Place the wholemeal and white flours, sugar, salt, yeast, mixed spice and orange zest into a large bowl. Stir them together then make a well in the centre of these dry ingredients. Pour the contents of the small saucepan (the paste and liquids) into the well then stir everything together to make a dough.

  2. Tip the dough onto a work surface dusted with flour and knead for 6 to 8 minutes until smooth and slightly sticky, adding flour as needed.

  3. Place the dough back into the bowl and cover it with clingfilm. Leave it in a warm place for 2 hours. The dough should have doubled in size.

Mix the filling:

  1. In a small bowl mix the mixed spice, ground cinnamon and light brown sugar together.

Make the rolls:

  1. Lightly flour a work surface and tip the risen dough out onto it. Lightly flour the dough and roll it out into a 15 x 26 inch (35 x 65cm) rectangle. Spread half of the melted butter over the surface of the dough. Evenly sprinkle on half of the spiced sugar and press it into the dough by rolling it over it gently. Fold the dough into thirds like a business letter. (see bottom of post for a .gif to explain).

  2. Roll this out again into a 15 x 26 inch (35 x 65cm) rectangle. Spread the remaining butter over the surface, evenly sprinkle on the remaining spiced sugar and all of the mixed dried fruit. Starting at the short edge of the rectangle, roll the dough up tightly into a log.

  3. Cut the dough into 12 even pieces. Place cut side-up into an oiled 9×13-inch baking tin. Cover with a clean tea towel and leave somewhere warm for 30 minutes to almost double in volume.

  4. Meanwhile preheat the oven to 180oC (350oF). 

  5. Once risen, bake the rolls for 20-25 minutes until golden brown around the edges. Leave to cool. 

Make the frosting:

  1. Place the cream cheese into a medium bowl and mix with enough powdered sugar to make a thick-ish glaze that will hold its shape when piped. If it’s not thin enough you can mix in water a dribble at a time to get the right consistency. Transfer the mixture to a sandwich bag, snip of the tip of one of the corners, and use as a piping bag to pipe cross-shapes over the rolls. 

  • *replace the butter in the filling with melted vegan margarine or just more rapeseed oil to make the recipe suitable for vegans
  • ** in the UK ‘mixed dried fruit’ is usually a mixture of sultanas, raisins, candied lemon peel and candied orange peel. If you can’t get that mix you can just use straight up raisins, currants or sultanas.

The post Hot Cross Chelsea Buns appeared first on Izy Hossack - Top With Cinnamon.


from Izy Hossack – Top With Cinnamon https://ift.tt/2IYzmTQ
Tuesday, March 27, 2018

Tahini Caramel Apple Tart

Tahini Caramel Apple Tart

Thanks to Food Network UK for sponsoring this post and to you guys for supporting me!

At uni for the past two years I’ve been lucky enough to live with two friends from my course – we all study Food Science & Nutrition. I assumed, going into this course, that all the other people I’d be studying with would be as interested in cooking as I am, but it’s become abundantly clear this is not the case, haha. Fortunately, my mates are definitely on the same level of interest as me, so we’ve made some pretty epic meals together. We are also OBSESSED with cooking TV shows.

Their favourite is Chopped because it’s the most ridiculously dramatic cooking show. Although I do find that show hilarious, I prefer the uhh.. traditional-style cooking shows, like re-runs of Nigella. My absolute fave though is Ina Garten – I’ve been watching ‘Barefoot Contessa: Back to Basics’ on Food Network recently where she cooks up an array of simple, accessible recipes. It’s one of the most beautifully filmed shows and her recipes are so good – especially in this series because it’s all about easy recipes which are my priority at uni, really. A cool fact I didn’t realise until talking to someone the other day is that Ina Garten actually used to work at the White House before building her own majorly successful food company (including a food emporium, cookbooks, TV shows and magazine columns) – such an inspiration.

Tahini Caramel Apple Tart

Inspiring women like Ina are part of why it feels so great to work in the ‘Food World’ as a female – I am incredibly lucky that I’ve found a job in an industry filled with supportive, entrepreneurial women who all help each other out whilst running successful businesses. As we all know, being a woman isn’t always the *easiest* thing but I think we’re moving in a positive direction. Apparently 77% believe there’s no limit to what they can achieve1 – a sentiment I agree with myself!

Tahini Caramel Apple Tart

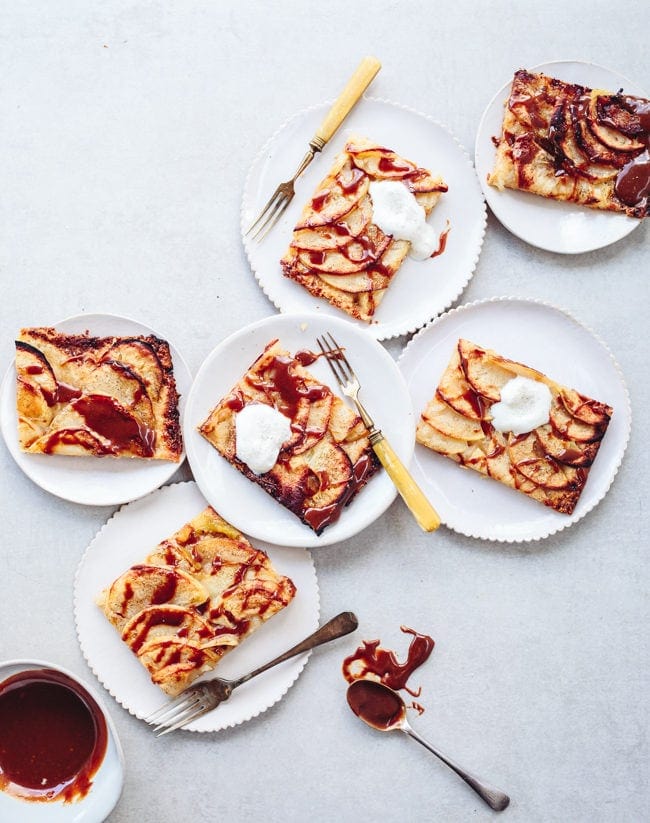
I’ve been thinking about this French Apple Tart ever since I saw Ina make it – I’m usually not a tart kind of person because lining a pastry tin is not my idea of fun, but this recipe is SO simple, there’s no faffing around. You roll out a flaky pastry into a rectangle, top with sliced apples and sugar and bake. Now, Ina brushes the apples with a apricot jam glaze (a trick my mum always uses too) but I opted for a tahini caramel instead – drizzled over the tart whilst still warm. It’s a little bit nutty and isn’t too sweet but if you’re daunted by caramel making you can always stick with the jam if you want!

Tahini Caramel Apple Tart

Recipe adapted from Ina Garten

Serves 8-12

For the pastry:

  • 2 cups (240g) plain white (all-purpose) flour
  • 1 tbsp granulated sugar
  • ½ tsp salt
  • ¾ cup (165g) unsalted butter, cold, cubed
  • up to 1/2 cup (125ml) ice water

For the caramel:

  • 1/3 cup (65g) granulated sugar
  • 2 tbsp water
  • 2 tbsp (30g) unstalted butter
  • generous pinch salt
  • ½ tsp vanilla extract or vanilla bean powder
  • 1 tbsp tahini
  • 4 tbsp milk

For the top:

  • 3 to 4 Bramley apples (peeled and cored)
  • ¼ cup (50g) granulated sugar
  • 2 tbsp unsalted butter (cut into little cubes)

Make the pastry:

  1. Place the flour, salt, sugar and butter into the bowl of a food processor. Pulse to cut the butter in – you want a mealy mixture with a few pea-sized lumps of butter remaining. Drizzle in the water (start with 4 tablespoons) and pulse in, adding more water a tablespoon at a time if needed. The mixture should be moist enough so that if you squeeze some together, it’ll stick.
  2. Tip the pastry mixture out onto a piece of cling film. Pat together with your hands into a rectangle then wrap and refrigerate for 1 hour.

Meanwhile make the caramel:

  1. Place the sugar and water in a large saucepan (silver/white ones a best so you can see the colour change). Place over a medium heat on the stove and stir just until the sugar dissolves then stop stirring. Let the mixture cook, tilting and swirling the pan, until it has reached an even, golden colour.

  2. Turn the heat all the way down, add in the butter, salt and vanilla. Let that butter melt a bit before picking the spoon back up and mixing it in. Once smooth, add the tahini and milk and stir through until smooth. Take off the heat and set aside.

Rolling and baking:

  1. Once the pastry has rested, preheat the oven to 200oC (400oF).
  2. Cut the apples in half and then slice into half-moons about ¼-inch (5mm) thick.
  3. Cut a piece of baking paper to fit a large baking tray. Unwrap the pastry, place onto the baking paper and dust with flour. Roll the pastry out into a rectangle slightly smaller than the piece of baking paper. Trim the edges so they are straight then transfer the pastry (on the baking paper) onto the baking tray.

  4. Place overlapping slices of apples diagonally down the middle of the tart and continue making diagonal rows on both sides of the first row until the pastry is covered with apple slices. Sprinkle with the 1/4 cup of sugar and dot with the butter.
  5. Bake for 35-45 minutes until the tart is dark golden around the edges and the apples have coloured slightly. Drizzle with the caramel (you may need to re-warm it over a low heat on the stove to get it drizzle-able again) then allow to cool before slicing and serving.
  • if you want to speed this recipe up, you can use a block of puff pastry or shortcrust pastry in place of making your own. 

Barefoot Contessa: Back to Basics airs Tuesday-Thursday 6-7am on Food Network UK

1 – research statistics provided by Food Network UK

The post Tahini Caramel Apple Tart appeared first on Izy Hossack - Top With Cinnamon.


from Izy Hossack – Top With Cinnamon https://ift.tt/2GelAPd

Monday, March 26, 2018

Bathroom Safety Tips to Keep in Mind

Content originally published and Shared from http://perfectbath.com

Bathroom Safety Tips


Your bathroom is a workhorse in the house and it’s also a space where we can retreat for a relaxing spa-like session in the evening.  It can be one of the only quiet spaces in a household with few people!  It’s also a place where, for a variety of reasons, safety might be an issue.  It pays to be aware of hazards in your bathroom and how to prevent injuries.

  1. Keep electrical grooming tools away from water. This is a big one, and we often see it ridiculed in comedies, but electrocution is no laughing matter.  Don’t use your hairdryer, electric razors, or other styling tools anywhere where there’s a chance you’ll drop them in water and find yourself at risk for a shock.bathroom-safety-precautions
  2. Make sure that bath mats are secure against the floor. Bath mats are wonderful to step out onto after you’ve showered or bathed, but they can also offer a slipping or tripping hazard.  The best mats have a rubberized bottom so that they won’t slip and end in a bad fall.
  3. While showering you’ve no doubt noticed that the tub can become very slippery. A great idea is to invest in a rubberized anti-slip mat for inside the tub.  Some of them even come with suction cups on the bottom.  You can either leave it in place if everyone showers, or drape it over the tub to dry if there’s a chance someone will be having a bath instead.
  4. Wall handles on the tub are also a great idea, especially if your household incorporates little ones or seniors. This can help not only to prevent a slip but also to help people with limited mobility in and out of the bathtub.  In serious cases of limited mobility, it’s also a great idea to have a handle installed by the toilet.
  5. It’s not nice to think about anyone walking in on you when you’re using the bathroom, and most of them have locks on the doors. If you have children, however, you might want to rethink this when they’re small – especially before they’re school aged.  A small child can get into a lot of trouble behind a locked door and they might not be aware of how to unlock it.
  6. Keep sharp objects tucked away in a high, safe location. This can include razors, nail clippers, or tweezers.  It’s best to keep these objects hidden from sight from young children who may hurt themselves trying to use them.
  7. Keep your light bulbs changed. There are so many obstacles and hard surfaces in a bathroom that a fall can become disastrous.  Lighting is key, so you’ll want to ensure that burnt out bulbs are replaced quickly, and that the lighting you have is in a good location to light up any potential hazards.

The inevitable, of course, happens no matter how safety conscious we are. However, with a little foresight and a keen eye for potential hazards, your bathroom can be made a lot safer.


This article was written by Katie from Steam Shower Store. Katie has been writing articles for over 10 years and is a commanding voice in the health and fitness community with her articles high in demand.

The post Bathroom Safety Tips to Keep in Mind appeared first on Perfect Bath Canada.


from Perfect Bath Canada https://ift.tt/2GfebuU

Impressions From the MDV Transalp

Mid March: Italy, Switzerland, Austria, sunshine AND great powder snow - sounds impossible? Think again, as that’s exactly what we experienced on the Marker Dalbello Völkl Transalp tour!

Almost at the summit

Disclosure: This trip was made possible with the help of Marker Dalbello Völkl who invited me on this trip. This does not influence the article as I maintain full editorial control of the content published on this site. Read the Transparency Disclaimer for more information on affiliate links & blogger transparency.

The kit for the TransAlp

Last Monday was a travel day. Last Tuesday was a powder day. Life is good, right until when it is not good anymore.

A long slog up

The TransAlp sounded like an Event that was made for me: A traverse of three countries on ski, from Livigno in Italy to the Kleinwalsertal in Austria via Switzerland. It’s exactly the kind of trips I enjoy and look for, so the invitation to the adventure from Marker, Dalbello and Völkl was after a bit of pondering and some questions quickly decided upon.

Michi enjoying the POW

What I couldn’t be aware of was that a flu I had decided to trouble me up at almost 3.000 m up in the Alps, and slow me down quite a bit in comparison with my more skilled tour partners.

Talabfahrt Bliss

The full story will follow before the season ends, if you can’t wait you should head over to Instagram and read between the lines on how the trip went.

The Road to AWESOMENESS

How much did you spent on your last piece of outdoor gear? And how much did you support your favourite blogs in the last months? If you enjoyed this trip report & other articles buy me a coffee - I work Full-Time on Hiking in Finland to bring you inspiring trip reports, in-depth gear reviews and the latest news from the outdoors. You also could subscribe to the rarer-than-ever Newsletter and follow along on Instagram, Twitter and Youtube for more outdoorsy updates!

Disclaimer: There are affiliate links in this article to help finance the website. Read the Transparency Disclaimer for more information on affiliate links & blogger transparency.

Wettersteinspitze


from Hiking in Finland https://ift.tt/2pCHphi

Wednesday, March 21, 2018

Essence at Windermere South

Building 2 has the perfect mix of condo residences to suit any homeowner. From efficient 536 sq.ft. studio suites to spacious 1245 sq.ft. corner units, Building 2’s condos have been meticulously designed to meet the needs and requirements of our buyers.

The post Essence at Windermere South appeared first on Vancouver New Condos.


from Buildings – Vancouver New Condos http://ift.tt/2HQwwiv

The Orchard

The Orchard is another exciting addition to the portfolio of towers launched nationally by Lamb Development Corporation (LDC) and Fortress Real Developments (FRDI). The project is planned to include two soaring 31-storey towers with a total of just under 500 units. Units range from about 500 sf to 2,000 sf and are priced from $250,000. Both phases include a ground floor retail component.

The project sits across from the Calgary Stampede grounds and will feature an apple orchard on the street level as a public space between two sleek towers. This is the 2nd collaboration in Calgary between LDC and FRDI; 6th and Tenth is now complete and occupied.

The post The Orchard appeared first on Vancouver New Condos.


from Buildings – Vancouver New Condos http://ift.tt/2ptxV82

Lyra Residences

The post Lyra Residences appeared first on Vancouver New Condos.


from Buildings – Vancouver New Condos http://ift.tt/2II0mXN

Tuesday, March 20, 2018

Carrot, Pine Nut, & Parmesan Skillet Pizza with Creamy Roasted Garlic Sauce

Carrot, Pine Nut, & Parmesan Skillet Pizza with Creamy Roasted Garlic Sauce

Although I consistently love tomato sauce on pizza, I do like to have a few alternatives up my sleeve to keep pizza night interesting. Some previous faves have been basil pesto (obvs because are you even a student if you don’t like pesto??) and blended sweetcorn (inspo from Homeslice in London!).

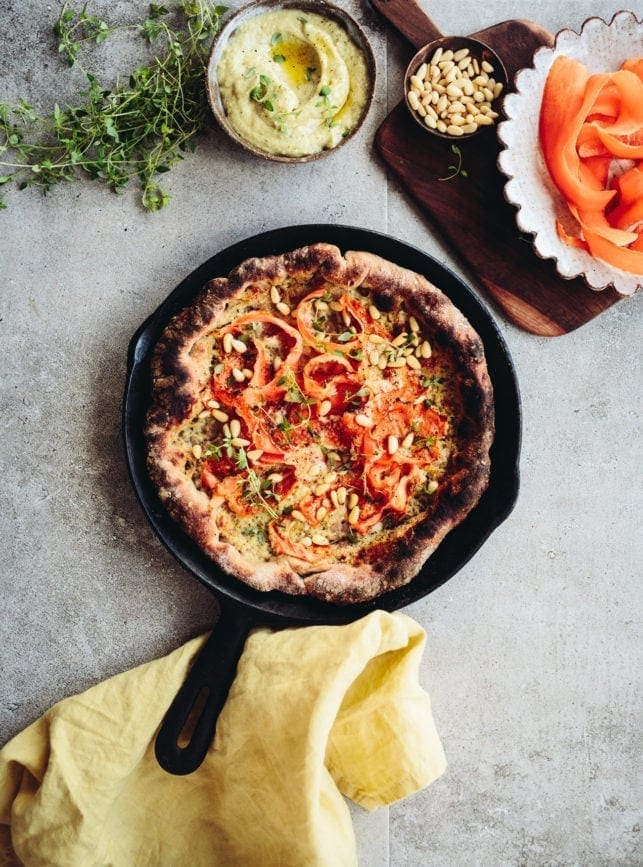
When flicking through my good friend Eva’s new cookbook, First We Eat*, the title of this recipe immediately caught my eye. Creamy roasted garlic sauce, eh??? I like all of those words… As I read through the recipe I realised it was almost like a super cheesy pesto – two WHOLE HEADS of garlic get roasted until soft and sticky, blended with a shit load of parmesan, olive oil and some other bits to make a creamy, tangy sauce. (N.B. another delicious way to use this is to stir a spoonful into some cooked veg. We did this with green beans and it was sooo good. I imagine it would be incredible in mashed potatoes too). On baking, the sauce bubbles and oozes making a sort of pimped-up garlic bread. There are carrot ribbons too, piled high, which slump down into sweet, al-dente slivers.

In the book, Eva uses a garlic sourdough for the crust but since I don’t have sourdough on the go, I’ve used my go-to No-Knead pizza dough from my own cookbook* 🙂 . She also cooks the pizza IN A FIRE which is so cool and something I definitely want to try. For now, I am without a fire, so I’ve included both the original method and the stovetop/grill method for you.

Carrot, Pine Nut, & Parmesan Skillet Pizza with Creamy Roasted Garlic Sauce*affiliate link

Carrot, Pine Nut, and Parmesan Skillet Pizza with Creamy Roasted Garlic Sauce

Recipe adapted from First We Eat by Eva Kosmas Flores

Makes two 9-inch pizzas

For the pizza dough:

  • 1/2 tsp instant yeast (easy bake yeast)
  • 3/4 cup plus 2 tbsp (225g) lukewarm water
  • 2 1/2 cups (300g) white bread flour
  • 1/2 tsp salt
  • 1 tbsp olive oil

For the creamy garlic sauce

  • 2 heads garlic
  • 1/4 cup plus 2 tbsp (90ml) extra-virgin olive oil
  • 3 ounces (85g) Parmesan cheese (grated)
  • 3 tbsp pine nuts
  • 2 tbsp fresh lemon thyme leaves
  • 1 tbsp white wine vinegar
  • 2 tbsp water
  • 1/4 tsp teaspoon freshly cracked black pepper

For the toppings:

  • 2 medium carrots (peeled and shaved into thin strips using a mandoline or vegetable peeler)
  • 1 1/2 ounces (43g) Parmesan cheese (shaved)
  • 2 tbsp pine nuts
  • 1 tbsp fresh lemon thyme leaves
  1. Preheat the oven to 400°F (205°C). 

For the pizza dough:

  1. Place the lukewarm water into a medium bowl. Stir in the yeast. Add the flour, salt and olive oil. Stir together well to make a shaggy dough. Cover with a clean kitchen towel and set aside for 2-5 hours. (If you want to leave for 8-12 hours instead, only use 1/4 tsp of yeast.)

For the creamy roasted garlic sauce,

  1. Cut the top quarter of the heads of garlic and place the heads in the center of a sheet of foil. Drizzle with 2 tbsp oil and wrap them, leaving a small opening at the top for steam to escape. Place the foil packet on a small pan and roast until the garlic is fragrant and golden, about 35 minutes. Allow to cool to room temperature. Squeeze the roasted cloves from the papery husks into a bowl, discarding the husks. 

  2. Add the roasted garlic, Parmesan, pine nuts, remaining oil, lemon thyme, vinegar, water, and pepper to a blender or food processor and puree until smooth. Set aside. 

For the skillet pizza:

  1. Turn the risen dough out onto a lightly floured work surface. Divide the dough in half and shape each half into a ball. Set aside to rest for 15 minutes. 

  2. Take one ball of dough, flour it, and use your fingertips to gently press and stretch the dough out (start at the centre and work towards the edge) into a 9-inch circle. 

  3. Place a 9-inch cast-iron skillet on the stovetop and preheat your oven grill to the highest setting with the oven rack at the top of the oven. 

  4. Once the skillet is hot, place the shaped dough into it and let it cook until the dough starts to puff up. Spread the creamy roasted garlic sauce on the pizza, leaving a 1-inch border around the edges, and top with the carrots, Parmesan, and pine nuts

  5. Take the skillet off the heat and place into the oven under the grill. Grill for 3-5 minutes until the edge of the dough is browned and the carrot ribbons are softened. 

  6. Remove the pizza from the hot skillet to a cutting board, garnish with more lemon-thyme and slice into 8 pieces. Repeat the dough shaping and baking as before with the other ball of dough. 

To cook it in a fire: – Bury a lidded 12-inch (30.5-cm) cast-iron skillet in the glowing red embers of a fire that has burned down a bit and has a mix of glowing embers and small flames. Allow the pan to preheat for 30 minutes, adding more wood to the fire, as needed, to maintain a low flame. – Transfer the crust to a pizza peel well-dusted with rice flour. Use heatproof gloves to remove the pan from the fire, remove the lid from the pan, and immediately transfer the stretched dough to the peel and into the pan. Top with the sauce, carrots, pine nuts and parmesan as per usual. – Cover with the lid and bury the pan in the embers. Cook until the dough is puffy and there are some deep gold or charred marks on the carrots, 5 to 20 minutes, depending on the heat intensity of your flame. Keeping the pan in the fire, expose the lid and remove it, allowing the pizza to cook for a few minutes more, uncovered, until the crust is completely cooked through in the center.

The post Carrot, Pine Nut, & Parmesan Skillet Pizza with Creamy Roasted Garlic Sauce appeared first on Izy Hossack - Top With Cinnamon.


from Izy Hossack – Top With Cinnamon http://ift.tt/2pqWaTi

Monday, March 19, 2018

Red Maple Residences

Red Maple Residences is coming to soon to Lower Lonsdale.  This six-story concrete low-rise will feature fifty-seven, one, two and three bedroom condos and townhomes. Most homes feature large balconies, and the penthouses will have sky lounges.

Located on 3rd and St. Georges, Red Maple Residences is conveniently located in the heart of Lower Lonsdale, you are just blocks away with all that the neighbourhood offer

To be kept up to date with this development and many others like it, register with us today.


This is not an offering for sale. No such offering can be made without a disclosure statement. E.&O.E.

The post Red Maple Residences appeared first on Vancouver New Condos.


from Buildings – Vancouver New Condos http://ift.tt/2DFLd5p

Tatlow Homes

Spring Olive Developments is building Tatlow Homes, a small boutique building featuring 33 one, two and three bedroom homes. Each home will feature a spacious well laid out floor plans, expansive kitchens great for entertaining, open concept living and dining as well as large windows, and balconies maximize the light and views on all units.

Located along the Marine Drive Corridor in the heart of North Vancouver, you will enjoy the very best of what the North Shore has to offer. A short walk brings you to Park Royal with all its shop and services, Ambleside Beach, and the new up coming Lions Gate Village the hundreds of locations right at your doorstep. Tatlow is the perfect blend of North Shore living with the convenience of a modern city home.

For more information on Tatlow homes, register with us today.

The post Tatlow Homes appeared first on Vancouver New Condos.


from Buildings – Vancouver New Condos http://ift.tt/2G5NKLE

Wednesday, March 14, 2018

Jumar in Downtown Squamish

Jumar in Squamish is a new mixed-use development located in the heart of downtown Squamish. This project will offer 101 mixture of 1- to 3-bedroom condominiums and townhouses. Imagine stepping out your door this morning to world-class mountain biking, kiteboarding, running, climbing and hiking. Or, for that matter, to fantastic dining, and great shops. Adventure on your terms, 7 days a week. That’s Squamish living. That’s Jumar.

The post Jumar in Downtown Squamish appeared first on Vancouver New Condos.


from Buildings – Vancouver New Condos http://ift.tt/2FC0DNX

Davie & Nicola in downtown Vancouver

Davie & Nicola in the West End by VivaGrand Developments is a new 22-storey high-rise with 4-storey podium development. This project will offer 104 market strata condominiums, 51 market rental units, 3 market townhomes and 9 rental townhouses. Davie & Nicola is ideally suited to those with an active lifestyle. Enjoy excellent access to the beach, park, seawall, watersports, and numerous community events, ranging from the annual Polar Bear Swim in winter to the Celebration of Light in summer.

The post Davie & Nicola in downtown Vancouver appeared first on Vancouver New Condos.


from Buildings – Vancouver New Condos http://ift.tt/2HBPadB

Jumar – Availability, Plans, Prices

Artist rendering of new proposed mixed-use development for The Tear Drop property in Downtown Squamish.

At a Glance

  • located at the corner of Buckley & Cleveland in Squamish
  • mixed-use development
  • 101 condos & townhouses
  • ground floor shops & services
  • 6,000 sq ft childcare centre
  • near Ecole Squamish Elementary & Howe Sound Secondary schools
  • outdoor adventure capital

Artist rendering of Downtown Squamish mixed-use development by LT Wave Holdings.

Live the Adventure
If you’re waiting to do something great this weekend, you’re waiting too long. Live the adventure. Now. Countless outdoor adventures begin here, on your doorstep. Downtown Squamish’s restaurants and shops are a few short steps away. The best of the mountains, the best of the city… It’s all within easy reach. Imagine stepping out your door this morning to world-class mountain biking, kiteboarding, running, climbing and hiking. Adventure on your terms, 7 days a week. That’s Squamish living. That’s Jumar.

Be A Presale Condo VIP!

Find Out About New Presales & Get Access to VIP Openings & Special Promotions!

Are you a realtor? Click here

  • Reload
  • Should be Empty:

Jumar’s design draws inspiration from the breathtaking landscape surrounding it; the building’s shape directly mirrors the iconic Squamish Chief. The exterior captures stunning views of the nearby peaks. Jumar’s stylish 1- to 3-bedroom condos and city homes are located in the heart of downtown Squamish, the adventure capital of British Columbia. The location is unrivaled. Drive 45 minutes south and you’re in downtown Vancouver. A mere 35-minute trip north takes you to Whistler Blackcomb, North America’s premier ski and four-season mountain resort.

Pricing for Jumar
This development is in its development application stage. Sign up above to our VIP list for priority access to Jumar updates.

Floor Plans for Jumar
A mixture of 1- to 3-bedroom condominiums and townhomes is proposed. Details are pending. Contact me today to discuss your needs.

Detail of Downtown Squamish mixed-use development at The Tear Drop property.

Amenities at Jumar
A 6,000 sq ft Bee Haven Childcare centre is planned for the northwest portion of the property with 24 infant/toddler spaces, 24 spaces for three to five-year-olds, and 30 school-aged spaces.

Parking and Storage
Jumar proposes to provide 116 residential and 48 commercial vehicle parking spots, in addition to generous bicycle storage space.

Maintenance Fees at Jumar
TBA.

Developer Team for Jumar
LT Wave Holdings is the Canadian subsidiary of Hong Kong-based LT Commercial Real Estate. They have retained GBL Architects to design Jumar. GBL is a progressive Vancouver-based firm of 38 architects, project managers and technicians with a 25-year reputation of providing a full range of architectural services to the private and public sector. GBL design with the belief that form plays a vital role in defining experience through an ever-changing dynamic between sculptural artistry and social responsibility. To that end, they regularly practice green design through the LEED Canada Program.

CHIL Interior Design is the hospitality studio of B+H, a global leader in interior design, architecture, and planning & landscape. CHIL’s award-winning portfolio spans Asia-Pacific, Europe, the Middle East, North and South America for brands such as Shangri-La, Hilton, Fairmont, Marriott, and Four Seasons. Originally founded in 1974, CHIL leverages global resources to produce designs that are guided by their clients’ vision and goals. Each client’s story is translated into a physical space. Deep research and an understanding of current and future trends result in spaces that improve the way people live, work, play, relax, and heal.

Expected Completion for Jumar
TBA.

Are you interested in learning more about homes in West or North Vancouver?

Check out these great North Shore Presales!

The post Jumar – Availability, Plans, Prices appeared first on Mike Stewart.


from Blog – Mike Stewart http://ift.tt/2FAR6GS

The Sentinel by Darwin in West Vancouver

The Sentinel by Darwin Construction is a new 26-storey residential development located at the most eastern point of West Vancouver. This project will offer 93 market condominiums and 4 three-storey detached townhouses. The Sentinel will be architecturally distinctive with an integrated approach to public art. LED lighting along the side and top of the tower, representing the image of a tree in the forest, will change colours with the seasons and for special events.

The post The Sentinel by Darwin in West Vancouver appeared first on Vancouver New Condos.


from Buildings – Vancouver New Condos http://ift.tt/2It8sTR

485 Commercial in Vancouver

485 Commercial by Cressey is a new 4-storey mixed-use development located at the northwest corner of Commercial Drive & East Pender. This project will offer ten studios, 21 3-bedroom townhomes, and ten rental apartments. The site is well-served by several public transit lines along Commercial Drive and Hastings Street and is within walking distance to shops and restaurants along both of those arteries.

The post 485 Commercial in Vancouver appeared first on Vancouver New Condos.


from Buildings – Vancouver New Condos http://ift.tt/2tSRLhy

How to Choose the Best Plant for Your Bathroom

Content originally published and Shared from http://perfectbath.com

Decorating your bathroom with plants won’t just make it look prettier, it will also help freshen up the air inside. Find out which plant to buy as you continue reading below:

Photo by Nick Karvounis on Unsplash

Lighting and Humidity
The bathroom’s moist environment is generally good for plants. But you should choose ones that can cope with the room’s wide temperature fluctuations — warm when someone is showering and cold when it’s left unused for several hours.

And since many bathrooms receive low levels of sunlight, plants should be able to cope with that too.

In fact, the most important thing is to pick plants that suit the level of natural light in your bathroom, Unsworth says. They should also suit the level of care you’re prepared to give them. Ferns, for example, require far more care to survive than succulents do.

Tropical plants are a good choice for bathrooms since they typically can deal with less direct sunlight than other plant species. They’re designed to grow in a rainforest, beneath a canopy of trees, which makes them ideal for indoor environments. Source: Houzz

Location
Bathrooms tend to be on the smaller side, so space for greenery is often limited. Large or tall plants don’t often work in bathrooms for this reason. A better option is to choose plants that can hang from the ceiling, or will trail down from a high shelf. The windowsill is another great location for bathroom plants, particularly as they can enjoy maximum light exposure here. Source: NaturalLivingIdeas

Plants for Low-Light Bathrooms:

  • Aloe Vera
  • Bamboo
  • Begonia
  • Boston Fern
  • Cast Iron Plant
  • Chinese Evergreen
  • Ficus Benjamina
  • Heart-Leafed Philodendron
  • Orchid
  • Peace Lily
  • Spider Plant
  • Dieffenbachia
  • Snake Plant

Plants for Bright and Sunny Bathrooms:

  • Asparagus Fern
  • Azalea
  • Gardenia
  • Kimberly Fern
  • Orchid

Low-Maintenance Plants:

Create a spa-like bathroom right in your home with the beauty of plants and the exquisite design of the fixtures that we offer. Call us for more information!


Contact:
Perfect Bath
Phone: Toll Free 1-866-843-1641
Calgary, Alberta
Email: info@perfectbath.com

The post How to Choose the Best Plant for Your Bathroom appeared first on Perfect Bath Canada.


from Perfect Bath Canada http://ift.tt/2FBa00n

Osprey Exos or Osprey Levity - Which Backpack to Get?

With Osprey offering two (four if you include the female models!) lightweight backpacks which share a similar construction the Question arises: Which backpack should I get? With this wee article I’ll try to help you answer that question!

Osprey Exos vs Levity

Disclosure: This article has been supported with gear from Osprey. As you know: I’m keepin’ it real and tell you how it is - I maintain full editorial control of the content published on Hiking in Finland. Read the Transparency Disclaimer for more information on affiliate links & blogger transparency.

If you’re a fan of lots of details and video, just go take a cup of ☕️ and maybe even some 🍫 and then watch this video:

The Exos and Eja (the Eja being the Women’s Model) have been for many years super popular lightweight backpacks from Osprey. As the original Exos came out some six or seven years ago a big Roar went through the Ultralight community (it was more Niche back then =) and there were those that liked them & used them and those who thought they’re too heavy. In 2018 the Exos is a well-established and liked pack, and as I said in my Osprey Levity Review: With Osprey packs hanging in stores around the globe it’s a lot easier to try on a pack and see if it fits you. I still think it is the perfect pack to introduce people to lightweight rucksacks and ultralight backpacking, so I’m really happy that these packs exist.

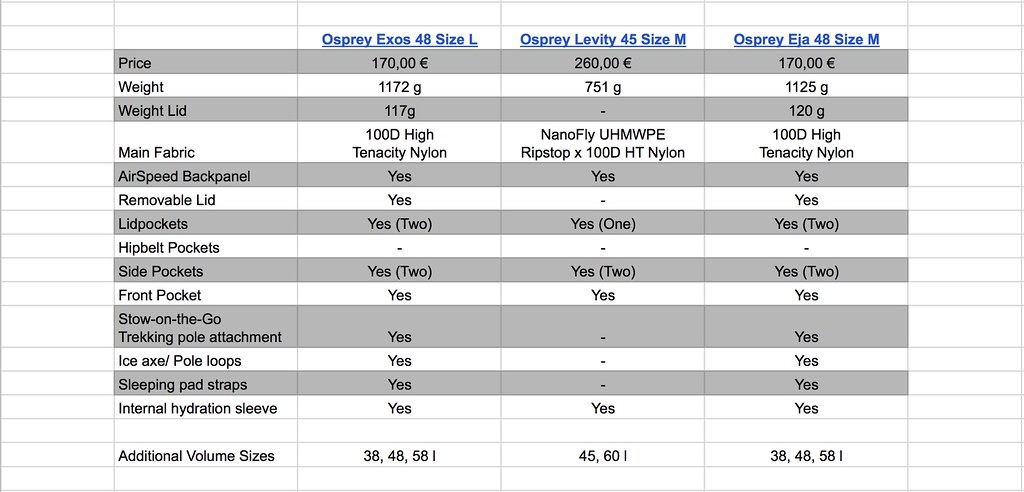
But there are several features which set these two packs apart (Dear Women: Please excuse that I refer now only to the male packs. The Eja and Exos have all the same features but the Eja has a Women’s Specific Fit. Everything I write about the Exos also applies to the Eja, I’m just lazy writing Exos & Eja the whole time! =). Lets look at them via this easy Table I made:

Osprey Exos vs Levity vs Eja

I think besides the weight and price, which are easy to see in this table, it’s also to remind oneself that the Exos will likely be a tad more durable than the Levity and should carry a few kilogram more in comfort, due to the thicker shoulder straps and the longer & more cushioned hipbelt. The Exos also has a plethora of options to attach and carry gear externally on the pack, something that the Levity is missing.

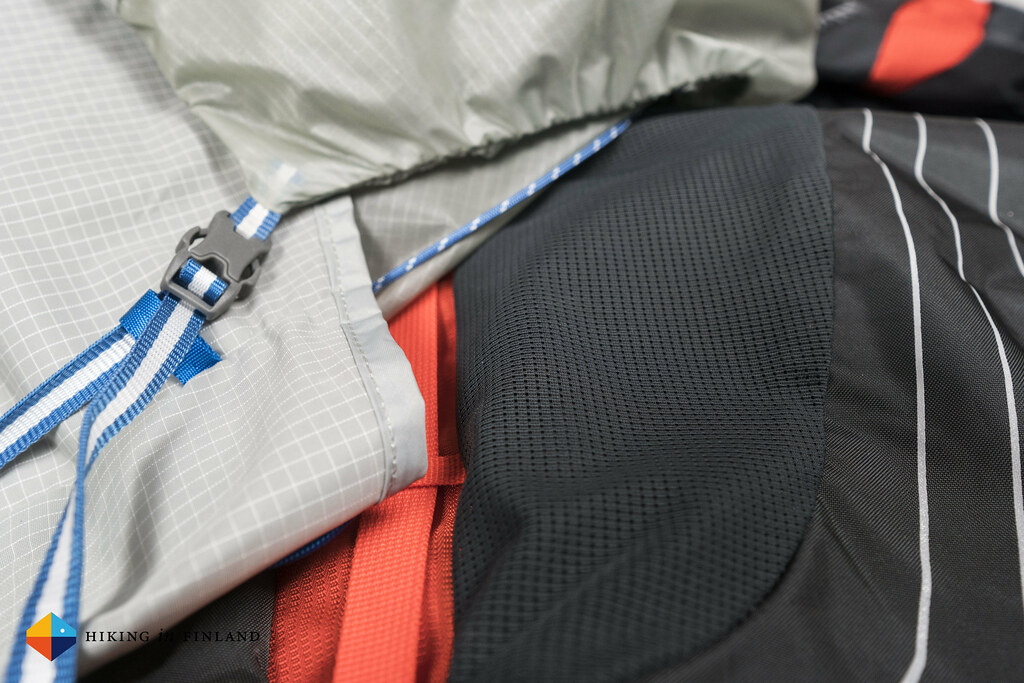
Shoulder Straps Eja vs Levity Material Differences Hipbelts!

The Levity on the other hand has it’s light weight going for it - it’s after all 421 g lighter than an Exos. I also found it a plenty comfortable pack for a week of backpacking, but that’s me. I also really liked the simplicity of the pack - not a lot of extra straps and things, stuff which I generally don’t use and so don’t need.

On the way to a Loch

Generally however I think that with the lower price, light weight and rich features of the Exos and Eja the majority of people are better off with these packs than the Levity. With 90€ cheaper than an Levity it’s a much easier investment into a new pack (and lets be honest, it’s nice to buy a high-quality piece of kit and not spend over 200 or 300€ for it!) and gives you some money to go on a weekend trip. If only the lightest Osprey pack will do, however, then it’s obviously the Levity one should go for!

Support this blog for no additional costs to you and buy your pack via one of these links. In North America order your Exos, Eja or Levity at these retailers, while in Europe you can buy your Osprey packs at Bergfreunde: Exos, Eja and Levity.

Questions? Hit me up in the comments underneath or ask on Twitter or Facebook!

Disclaimer: There are affiliate links in this article to help finance the website. Read the Transparency Disclaimer for more information on affiliate links & blogger transparency.


from Hiking in Finland http://ift.tt/2GsvtWD

Monday, March 12, 2018

4575 Granville in Shaughnessy

4575 Granville is a new townhouse development located in Vancouver’s upscale Shaughnessy neighborhood. This project will offer 21 stacked townhouses in two buildings with a rooftop deck and a private patio. 4575 Granville is ideally suited for young families who wish to raise their children in a more traditional residential area. Prestigious private schools, shops, restaurants, and parks are just a few steps away. Downtown Vancouver, YVR Airport and most parts of the city can be reached within 15 minutes.

The post 4575 Granville in Shaughnessy appeared first on Vancouver New Condos.


from Buildings – Vancouver New Condos http://ift.tt/2p7NbpU

Friday, March 9, 2018

The Hollywood Residences in Kitsilano

The Hollywood Residences by 4184 Investments is a new 6-storey mixed-use concrete development located at 3133 West Broadway in Kitsilano. This project will offer 4,423 sqft of new ground floor retail space and 40 condominiums. Part of the development plan is the restoration of the adjoining 1935 Art Deco Hollywood Theatre into a state-of-the-art performing arts centre. Once a cinema, programming for the Hollywood will be diversified to include musical performances, live theatre, comedy, festival events, seminars and lectures, and events organized by non-profit groups, as well as independent film screenings. At The Hollywood, treasured memories will continue to be created.

The post The Hollywood Residences in Kitsilano appeared first on Vancouver New Condos.


from Buildings – Vancouver New Condos http://ift.tt/2FtRWRF

Thursday, March 8, 2018

The Hollywood Residences – Availability, Plans, Prices

Rendering of new Kitsilano pre-sale condos and renovated Hollywood Theatre.

At a Glance

  • located at 3133 West Broadway in Kitsilano
  • 6-storey, mixed-use concrete mid-rise
  • 40 condominiums
  • 4,423 sq ft of new ground floor retail space
  • restoration & operation of Hollywood Theatre
  • in the heart of Kits commercial district
  • excellent walkability, frequent transit service

Cultural Revival
The Hollywood Residences is an exciting new mixed-use development in Vancouver’s vibrant Kitsilano neighbourhood on the city’s West Side. The six-storey mid-rise will contain 4,423 sq ft of ground floor commercial space and 40 market strata residential units on the remaining five storeys, of which 52% are suitable for families. Part of the development plan is the restoration of the adjoining 1935 Art Deco Hollywood Theatre into a state-of-the-art performing arts centre. Once a cinema, programming for the Hollywood will be diversified to include musical performances, live theatre, comedy, festival events, seminars and lectures, and events organized by non-profit groups, as well as independent film screenings. At The Hollywood, treasured memories will continue to be created.

Be A Presale Condo VIP!

Find Out About New Presales & Get Access to VIP Openings & Special Promotions!

Are you a realtor? Click here

  • Reload
  • Should be Empty:

Pricing for The Hollywood Residences
This project is in its development application stage. Sign up to our VIP list above for priority access to updates for The Hollywood Residences.

Floor Plans for The Hollywood Residences
The proposed unit mix is for the following market strata condominiums:

  • 6 x studios
  • 32 x 1-bedrooms
  • 15 x 2-bedrooms
  • 1 x 2-bedroom + den
  • 5 x 3-bedrooms

Contact me today to discuss this unique opportunity in support of Vancouver’s arts community.

Amenities at The Hollywood Residences
The residential building is set back from the Hollywood Theatre to allow for a cafe or restaurant patio to enliven the streetscape. Level 2 residents on the laneway side will enjoy the use of private patios with privacy landscaping on the northern edge. Top floor homes each have their own private rooftop terrace. There is also a shared rooftop terrace for the use of other building residents.

Parking and Storage
In addition to restricted, metered street parking on West Broadway, The Hollywood Residences will offer parking in two levels of underground. Residents will be provided with 43 vehicle spaces, of which two are handicapped. Commercial tenants and their customers will have use of three regular vehicle stalls and one handicapped. One Class B loading space is available for retail/restaurant uses. There are also 52 residential bicycle parking spaces. At street level, another seven bicycle spaces will be provided for the residential building tenants and 12 for use by theatre patrons and staff.

Maintenance Fees at The Hollywood Residences
TBA.

Developer Team for The Hollywood Residences
The property owner, 4184 Investments, has retained Marianne Amodio Architecture Studio to design The Hollywood Residences. MAAStudio is focused on design solutions that explore alternative ways of home ownership and dwelling. Their residential sector centres on multi-family residential buildings, micro co-housing, and custom multi-family homes. This practice is based on the principle that living smarter is better than living bigger. Through creative thinking, they craft solutions that speak to today’s issues of affordability and social and environmental sustainability, and our drive to a sharing economy. In 2016, MAAStudio earned the Architectural Institute of British Columbia’s emerging-firm award.

Expected Completion for The Hollywood Residences
TBA.

Are you interested in learning more about other homes in Kitsilano, Point Grey, or Kerrisdale?

Check out these great Kitsilano Presales!

The post The Hollywood Residences – Availability, Plans, Prices appeared first on Mike Stewart.


from Blog – Mike Stewart http://ift.tt/2IdYDZY

4575 Granville – Plans, Availability, Prices

Proposed Shaughnessy townhouse development at Granville & 29th.

At a Glance

  • located in Vancouver’s upscale Shaughnessy neighbourhood
  • 21 stacked townhouses in two buildings
  • private patios & rooftop decks
  • near prestigious private schools
  • convenient connections to airport & downtown
  • walking distance to VanDusen Botanical Garden
  • close to South Granville shops & restaurants

Aerial view of Shaughnessy townhouse development designed by Stuart Howard Architects.

The New Shaughnessy
First Shaughnessy is an exclusive Vancouver neighbourhood that was established by the Canadian Pacific Railway in 1907 for the homes of the city’s elite. Its large properties and elegant, tree-lined streets were of such great appeal that in the late 1920s and early 1930s, adjacent land was developed as Second and Third Shaughnessy. Here, the properties are smaller and the houses are of a more modest size. In these two areas of Shaughnessy, we are now seeing new housing types being developed, particularly on or near arterial roads and around shopping areas. This development is seeking a rezoning under the Affordable Housing Choices Interim Rezoning Policy, which means owning a home in this desirable neighbourhood can be more affordable.

Be A Presale Condo VIP!

Find Out About New Presales & Get Access to VIP Openings & Special Promotions!

Are you a realtor? Click here

  • Reload
  • Should be Empty:

Stacked townhouses contained in two wood frame buildings separated by a courtyard, have been designed by Stuart Howard Architects to replace a single-family home at 4575 Granville Street. One building, the larger of the two, fronts Granville Street, while the second is placed on the lane side of the property where the underground is also accessed. With 13 three-bedroom homes, 4575 Granville is ideally suited for young families who wish to raise their children in a more traditional residential area.  Located on the main arterial connecting downtown Vancouver with YVR airport, this central location means that most parts of the city can be reached within 15 minutes.

Pricing for 4575 Granville
This project is in the development application stage. Sign up to our VIP list above for priority access to 4575 Granville updates.

Floor Plans for 4575 Granville
A mix of 13 three-bedrooms – from 1,300 to 1,723 sq ft – and eight 515 sq ft 1-bedrooms is being proposed for 4575 Granville. Those with a serious intent to purchase are advised to contact me today to discuss this exclusive opportunity.

Amenities at 4575 Granville
Each home is provided with a rooftop deck and a private patio surrounded by privacy landscaping. An elegant courtyard between the two buildings has paving stone walkways, three shaded garden plots with benches, and a children’s play area.

Parking and Storage
One level of underground parking will provide residents with 32 standard vehicle parking stalls and 32 secure bicycle spaces. Six Class B bicycle spaces at ground level will be located near the laneway entrance walkway.

Maintenance Fees at 4575 Granville
TBA.

Developer Team for 4575 Granville
Stuart Howard Architects have been chosen to design the development of 4575 Granville. They are committed to creating high-quality, cost-effective, innovative design solutions for their clients. Over the years, the firm has been involved in many building types with a strong emphasis on residential buildings, and heritage restoration and rehabilitation. Various members of the firm are multiple award winners in residential design.

Expected Completion for 4575 Granville
TBA.

Are you interested in learning more about other condos or townhouses on the Westside of Vancouver?

Check out these great Westside Presale Condos!

The post 4575 Granville – Plans, Availability, Prices appeared first on Mike Stewart.


from Blog – Mike Stewart http://ift.tt/2DdzM4E